
This is my first ever attempt at decorating a cake. It's definitely not perfect, but as first tries go, I think it turned out pretty good! I asked Drew for cake decorating supplies for my birthday. So, on my birthday, I printed out some coupons, and Drew took me to Michaels. It was VERY exciting!
The cake is chocolate, but there are strawberries between all the layers. See all the pretty red strawberries?

Do you like my cake stand? It's "new" and I'm super excited! By "new," I mean new to me. It's actually old. A couple months ago, when I was visiting my parents, my mom and I went antiquing, and I found this delightful little piece. It was made between 1954 an 1957. It has pretty little harps around the base. I was very excited to use it for the first time last week.
This cake uses this Martha Stewart recipe, the chocolate frosting recipe from the back of the Hershey's cocoa box, Alton Brown's ganache, and this buttercream recipe.
This particular Martha recipe is really easy. She has a chocolate buttercream frosting recipe on the same page as the cake, but I read a few reviews saying it was a little bland.
You'll need these items:

Martha calls for some buttermilk, but I hate buttermilk and don't foresee finishing a whole jug of it before it goes bad. According to my Betty Crocker cookbook, A tablespoon of vinegar plus enough milk to make 1 C of liquid (i.e., 1 C minus 1 T milk) is the same as if you had just used buttermilk. Other than that, I followed her recipe exactly.

Doesn't that batter look awesome?!
I buttered and floured my cake pans instead of using Pam. Some reviews from people who used Pam said they couldn't get their cakes out in one piece.
I buttered and floured my cake pans instead of using Pam. Some reviews from people who used Pam said they couldn't get their cakes out in one piece.

While my cakes were baking I sliced up some strawberries. I ended up using 1 1/2 containers of strawberries.


I also selected five strawberries and dipped them in chocolate. I've learned that if you add a spoonful of shortening to the chocolate when you melt it, the chocolate comes out much smoother and you get prettier strawberries. They set in the fridge until I finished decorating the rest of the cake.
My cakes had a little trouble coming out of the pans, so I ran my spatula around the sides.

Then they came out just fine!

While they cooled, I prepared some chocolate ganache. This video is a clip from Alton Brown's show. It has the recipe for the ganache and explains well how to ice the cake.
Here's the recipe, though, if you aren't fun, and you don't like videos:
Chocolate Ganache:
6 oz heavy cream
3 T light corn syrup
12 oz chopped dark chocolate
1/2 t vanilla extract
1. Put the first three ingredients in a pan over medium heat.
2. After fully melted and combined, add vanilla.
Your ganache should look like this when you're done:

Yum! Have a finger-full. It's delicious.
Now, while your ganache is cooling cut your cakes in half. Your two cakes should be able to make four layers. It's easier than it looks.
I used this handy dandy tool to do it. You can get here.

The wire you see can be adjusted. I found it was easiest to put the wire at the appropriate level then hold the tool straight up on the table and move the cake through the wire. I really don't have a better way of explaining it and my photographer was otherwise engaged that day. It's a two hand process.
The thing the little wire-y cake level tool is on is my turntable that I set the cake on after I finish leveling. You can get one here. I think I paid $13 for it. You can't buy it on Michael's website, though. They only sell in store. Hobby Lobby carries similar turntables, but they are more expensive.


By the time you finish doing this to both cakes, your ganache should be sufficiently cool to start stacking.


Put your next layer on and repeat the process. The very top layer should have been the bottom of one of the cakes. It's perfectly level. Also, the top layer shouldn't have any ganache and strawberries on top.
This is a good time to prepare your frosting.
Yum!


Use an offset spatula to spread your frosting. It'll push off the sides pretty easily.

Not looking so great yet. I used a cake comb to make a pretty effect on it. I used this awesome tool, which you can buy here.

It comes with lots of different shaped pieces and you can put them in any order you want, so there are lots of different possibilities.
Here are the results:

After I finished using the comb, I put my cake on its stand and started on the extra pretty frosting,
I made this buttercream recipe and dyed half of it pink. I used bags and piping tips from this awesome set.
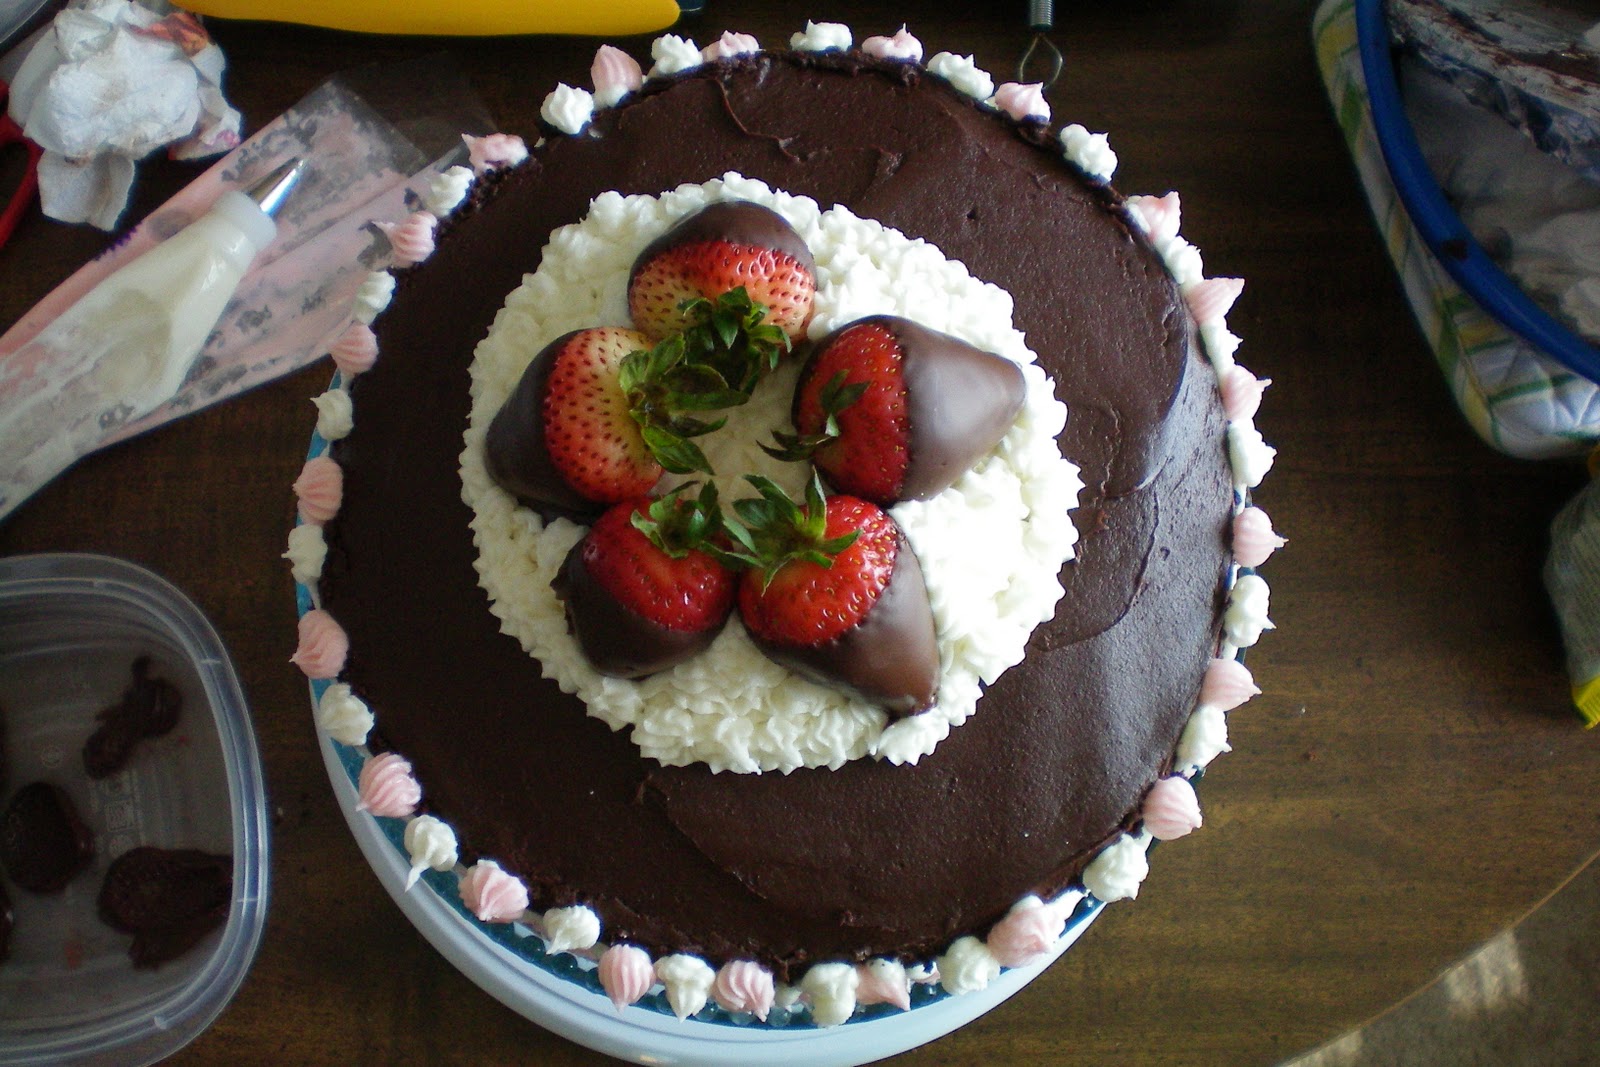
This is what I got when all was said and done:


 It was delicious! This took hours, but I enjoyed every minute. (Except the part where I had to do lots of dishes.) It was surprisingly therapeutic. You should decorate a cake immediately. You'll have lots of fun. I promise.
This is what I got when all was said and done:


My hips grew from the pictures alone. This looks amazing, Court!
ReplyDeleteHaha! Thanks! :)
ReplyDeleteWow, that cake looks incredible! I think you did really well with decorating it- I'd buy it! haha For sure going to try making this some time, thanks for posting!
ReplyDelete